Adobe Photoshop Walk-through
I took a picture a couple of years ago and came across it again recently. It was taken at sunrise and exposed for the sky, almost silhouetting the girl. So I decided to fix that, then it turn into a project. I decided to illustrate the major steps.

This is the original image taken at Ft Walton Beach, FL. I really liked the sunrise and my daughter was standing there so she ended up in the picture as well.
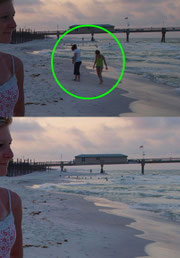
I usually try to pay attention to the background, but since this was what I term as a happy-snap, I didn't. The two beach combers are a distraction that wasn't needed, so I erased them.
I made a copy of my background image, then using the rubberstamp tool, I basically painted them out. Its easy when using the rubberstamp tool to get repeating patterns, so its important to constantly resample and play with the opacity setting.
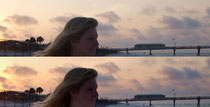
Since this was originally a picture for the sunrise, I didn't want to loose that. But I also wanted it to be more impacting.
I made another copy of the background image and added a layer mask to it. Using a large, soft brush (tool), I painted black on the mask, hiding everything below the horizon. I then used Hue & Saturation, increasing the Sat about 14 points to help bring out more of the colors. Next I opened the Brightness/Contrast to add a little more contrast to the clouds against the sky.

Now for the main pupose of working on this photo. The model needs to be lighter so she can be seen.
I again copied the background image. Using the Levels adjustment, I lightened the overall RGB values, then adjusted individually the Red, Green & Blue values. I needed to seperate the model from the background, so I added a layer mask. I used the brush tool, painting black on the mask to hide the areas I didn't want lightened (basically the background and sky). Most people shudder when trying to mask hair, but if you very the brush size and opacity, you should have an easier time. Remember that I still have the original image underneath the lighter one, so if its not perfect, no one will know.

Females always hate tan line, so I needed to get rid of them.
I used the Eyedropper tool and sampled the areas next to the tan line. When I was satisfied with the color I added a layer on top. Next I selected the Brush tool and sized the brush to be about the same as the width of the lighter band of skin and lowered the opacity to 7%. I like working with a lower opacity and build up as it helps in blending. I then started painting over the tan lines. When you used the Brush tool though, its flat color, no texture. To help with realism, I chose an Overlay Layer Blend Mode.
She had a lot of redness from to much sun, giving her a splotchy appearance.
I added another layer on top and using the Eyedropper tool, selected a more golden tan color. I picked the Brush tool again and increase the size and raised the opacity to 13%. I then worked mostly on the areas highlited smoothing out the red and at the same time lightening the tone. I changed the Layer Blend Mode from Normal to Screen to help with texture and lighten the skin a little more, but 100% was too much, so I lowered the layer opacity to around 80%.

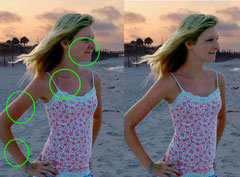
In lightening, her hair took on kind of a brassy look to me.
I added another layer. I used the Eyedropper tool and sampled one of the magenta flowers from her shirt. I opened the color dialog and slid that hot pink into more of a lighter pink. I chose this color to fight the green tint in the hair. I selected the Brush tool again and painted over the areas in her hair that had the brassy green cast. I changed the Layer Blend Mode to Overlay to work the painted pinks in so they could combat the green.

So this is the finished picture. I cropped the image and used the Rule of Thirds to position her. I wanted her to appear natural, not artificially lit, and I'm pretty happy with the results.